The primary audience of this article is for people who have no prior experience with Git or version control systems. In this article, I am going to recommend a Git workflow that’s easy to get started with and is suitable for vibe coding. I will try to keep it as simple as possible.
If you are interested, you can read more about what is vibe coding.
What is version control?
Version control is like a save button for your code (or documents), but way smarter.
It lets you:
- Track changes over time
- Go back to earlier versions if something breaks
- Collaborate with others without stepping on each other’s toes
The most popular tool for this is Git, which I will cover in this article.
Why do I need version control?
The ability to revert the current changes and go back to an earlier version is crucial for vibe coding. As the AI agent makes changes to your code, you will need a way to discard those changes if things go wrong. Believe it or not, this happens more often than you think.
Common workflows in Git
In this article, I am going to recommend a simple workflow called Trunk-base Workflow.
There are other common workflows, but they are out of scope for this article. In case you are interested, I include the links below:
Getting Started with Git
Getting a GitHub account
Do this step if you don’t want to have your personal email address shown in public repositories. If you don’t care about that, you can skip this step.
- Go to https://github.com and sign up for a free account.
- Log in and go to https://github.com/settings/emails
- Take a note of your GitHub email address. It should look like
something@users.noreply.github.com.
Installing Git
Go to the download page and install Git for your operating system: https://git-scm.com/downloads
Basic Configuration
Follow the platform-specific instructions to set up Git.
For example:
git config --global user.name "Your Name"
git config --global user.email "your.email@example.com"
You can use your personal email address or the GitHub email address you noted earlier.
Testing Your Setup
If you are already familiar with Git, you can skip this section.
The goal is to get comfortable with how Git works. Once you have a grasp of it, you can use a UI tool such as VS Code or GitHub Desktop to manage your repositories.
Create an empty directory and initialize a new Git repository for testing:
mkdir my-vibe-project
cd my-vibe-project
# Make this directory a Git repository
# You only need to do this once per project
git init
Create a new file and add it to the repository and save it with a commit message.
echo "Hello world" > hello.md
# Add the new file so we can version it
git add hello.md
# Commit or save the changes with a message
git commit -m "Initial commit"
You should see a message like
 1 file changed, 1 insertion(+)
 create mode 100644 hello.md
Use git log command to see what you just saved:
git logcommit 4eab9afd4c3849dd654882d864a9015e02c5d486 (HEAD -> main)
Author: You Name <your-email@users.noreply.github.com>
Date: <date and time>
Initial commitTry to create another file and repeat the process. This is basically how you save your work or create checkpoints in Git.
If you are looking for more practice, you can try https://rogerdudler.github.io/git-guide/.
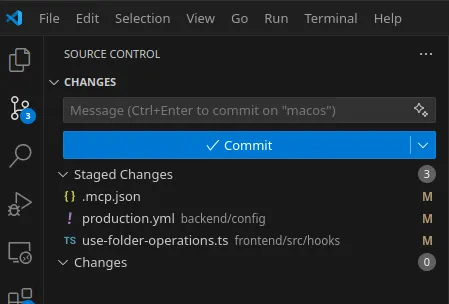
Testing Your Setup with VS Code
If you are not comfortable with the command line, you can use Visual Studio Code (VS Code).
The idea is the same: create a new file, go to the Source Control panel, move the file from “Changes” to “Staged Changes”, and then commit it with a message.
Trunk-based Git Workflow
Now you have a basic understanding of how Git works, let’s talk about the Trunk-based workflow.
The idea is very simple: you use the main branch to keep all your finished work. Whenever you need to make a change or add a new feature, you create a new branch from main, make your changes, and then merge it back to main when you’re done.
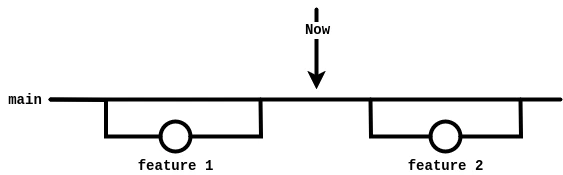
This way, if anything goes wrong in the feature branch, you can simply discard all the changes and start it over.
Steps for working on a new feature:
- Create a new branch from
main:# Verify the current branch is main git branch # Create a new branch from main git checkout -b my-feature-branch - You now can start making changes. Vibe code or handcraft as you wish.
- When you are done, use
git statusto see what files have been changed. Usegit addandgit commitcommands to save your changes. Honestly, if you are new to Git, it’s probably easier to use a UI tool like VS Code for this step. IMPORTANT REMINDER: Double check that you don’t commit any sensitive information such as API keys or passwords in this step. - Once you have committed the changes, it’s time to merge them back to the
mainbranch:
You should see something like this:# Switch back to main branch first git checkout main # Merge the feature branch into main git merge my-feature-branch # Verify that the changes are merged git logcommit 4eab9afd4c3849dd654882d864a9015e02c5d486 (HEAD -> main)
Congratulations! You have just completed an iteration of the Trunk-based workflow.
Continue to repeat the steps above for each new feature or change you want to make.
Steps for Reverting a Change
Revert a single file:
git restore <path to the file>If your Git doesn’t support the git restore command, do this:
git checkout -- <path to the file>Revert part of a file:
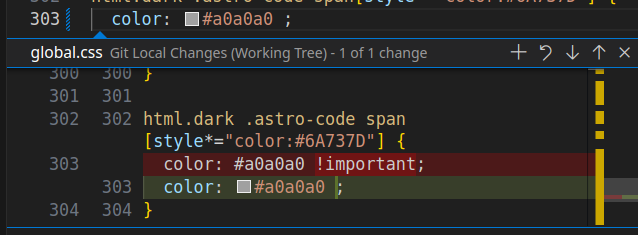
Use VS Code or another IDE to do this.
Click on the blue bar on the left side of the file to see the before-and-after changes. Click on the “Revert Change” button to revert the change.
Delete a feature branch:
If you don’t need the branch anymore, you can simply delete it:
# switch back to main branch first
git checkout main

# Delete
git branch -d my-feature-branch
Revert to a checkpoint:
If you know a particular checkpoint that you want to revert to, you can run this on your feature branch.
# Double check that you are on the feature branch
git branch

# Find out the commit hash you want to revert to:
# A commit hash looks like this: 4eab9afd4c3849dd654882d864a9015e02c5d486
git log

# Revert
git reset --hard <commit-hash>
This is a destructive command, please don’t use on the main branch. Also, this command will wipe out all the uncommitted changes (unsaved changes), so be very careful when you run it.
Optional - Push the main branch to GitHub
It’s a good idea to save a copy of your Git repository somewhere else as a backup. I recommend GitHub. Here’s how:
- Create a repository on GitHub. Choose public or private repo based on your need. Don’t add README or any other files. You want an empty repository so you can push your local repository.
- After that, take a look at this full guide.
I am only going to provide the high level steps here:
-
Depending how you authenticate with GitHub, obtain a HTTPS or SSH URL for your repository.
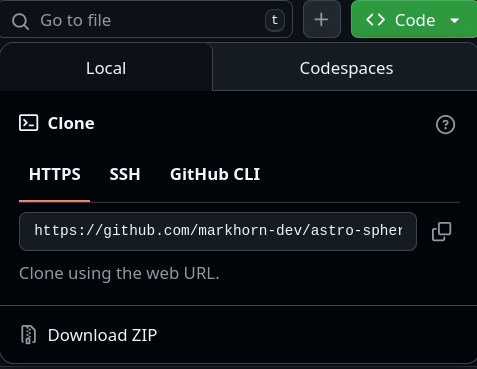
-
Once you have the URL:
git remote add origin <repository url> # Verify the change git remote -v # Test the connection git fetch origin -
If no issues, push the
mainbranch to GitHub:git push origin main
Note: origin is just a conventional name for the remote repository. you can change it to whatever you like, but “origin” is a common name used among developers.
Q&A
Why Trunk-based Workflow?
There are other common Git workflows, such as Git Flow workflow, but I like the simplicity of Trunk-based workflow. It encourages good habits such as small, incremental changes, and it allows you to quickly revert changes if something goes wrong. This goes well with vibe coding.
How is Trunk-based Workflow different from Feature Branch Workflow?
Trunk-based Workflow is a subset of Feature Branch Workflow. It emphasizes using short-lived branches that are meant to be merged back into main frequently, ideally multiple times a day. In some ways this is more agile.